Friday, August 31, 2012

An Apple a Day...

As summer transitions into fall, apples are upon us!
Here are some facts about one of America’s favorite fruits:

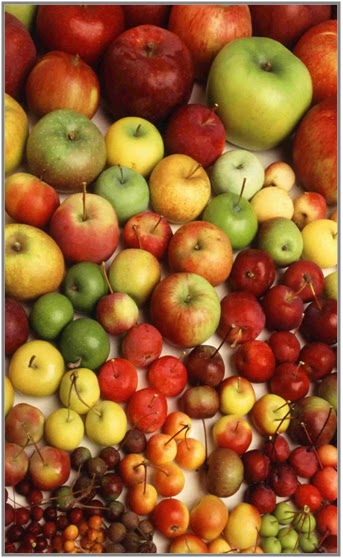
·         The crabapple is the only apple native to North America.
·         2,500 varieties of apples are grown in the United States, and 7,500 varieties of apples are grown throughout the world.
·         Apples are grown in all 50 states (36 states commercially).
·         The average size of a United States orchard is 50 acres.
·         Apples are fat, sodium, and cholesterol free. A medium apple is about 80 calories. Apples are a great source of the fiber pectin – one apple has five grams of fiber.
·         The pilgrims planted the first United States apple trees in the Massachusetts Bay Colony.
·         Apple trees take four to five years to produce their first fruit.
·         Most apples can be grown farther north than most other fruits, because they blossom late in spring, minimizing frost damage.
·         It takes the energy from 50 leaves to produce one apple.
·         Apples are the second most valuable fruit grown in the United States. Oranges are first.
·         In colonial time, apples were called winter banana or melt-in-the-mouth.
·         Apples ripen six to ten times faster at room temperature than if they were refrigerated.
·         Archeologists have found evidence that humans have been enjoying apples since at least 6500 B.C.
·         Sixty-three percent of the 2005 U.S. apple crop was eaten as fresh fruit.
·         National Apple Month is the only national, generic apple promotion conducted in the United States. Originally founded in 1904 as National Apple Week, it was expanded in 1996 to a three-month promotional window from September through November.
 Source: University of Illinois Extension

Apple Sauce Recipe
Ingredients:
·         4 apples – peeled, cored and chopped
·         3/4 cup water
·         1/4 cup white sugar
·         1/2 teaspoon ground cinnamon

Preparation:
In a saucepan, combine apples, water, sugar, and cinnamon. Cover, and cook over medium heat for 15 to 20 minutes, or until apples are soft. Allow to cool, then mash with a fork or potato masher. 

Recipe courtesy of www.allrecipes.com


Thursday, August 30, 2012

How To Use Flavored Vinegars


Flavored vinegars can impart intense, full-bodied flavor to salad dressings, soups, sauces, and even desserts. When you use a homemade recipe or purchase flavored vinegars, cooking with the acidic ingredient can turn a ho-hum recipe into a work of art. Whether you are looking for a more complex flavor or simply trying to add some extra zip, try substituting regular vinegar with a fruit, herbal or spicy vinegar in your next recipe.

Here are some ideas to get you started:
·         Replace apple cider, red wine, balsamic, or rice wine vinegar in recipes, such as sweet-and-sour sauce or potato salad, with equal amounts of flavored vinegar.

·         Incorporate fruit-flavored vinegars into fruit-based desserts, such as berry pie or pear compote, by heating fruit-flavored vinegar, such as raspberry or pomegranate, with twice the amount of sugar in a small saucepan over low heat until the mixture boils. Toss the cooled vinegar-sugar mixture with the fruit before using the fruit in the recipe. A vinegar-sugar glaze can also be used to coat pie crusts and fruit tarts. Due to its additional sugar content, fruit-flavored vinegar may caramelize if cooked over high heat, so it is best to reduce the cooking implement’s heat or add the vinegar to your recipe just before serving.

·         Add herbal vinegar, such as lemongrass or garlic, to soups and stews, such as hot-and-sour or lentil, just before serving to enhance their flavor. When substituting herbal-flavored vinegar for plain vinegar, reduce the amount of any additional herbs called for in the original recipe to avoid competing flavors.
Source: Livestrong.com


When in doubt, flavored vinegar can enhance a homemade salad dressing, like this one:

Honey Garlic Vinaigrette
 
Ingredients:
·         1 cup vegetable oil
·         1/3 cup apple cider vinegar
·         3 tablespoons honey
·         2 cloves garlic, minced

Preparation:
In a container, combine oil, vinegar, honey, and garlic. Cover, and shake until blended. Set aside for 45 minutes to allow flavors to combine. Shake again before serving.

Recipe courtesy of www.allrecipes.com

Tuesday, August 28, 2012

Patty Pan Squash Exposed


Lately in your CSA share or in the Fresh Gatherings’ Harvest Market you may have seen some mysteriously shaped squash. This flying saucer-shaped squash is called patty pan or scallop squash. The scalloped flying saucer shape makes them a bit of a novelty and a little difficult to figure out how to slice, but they cook and eat much like your other favorite kinds of summer squash. Kids are sometimes even more tempted to try them because of their fun shape. You can begin to eat them when they are only a couple inches in diameter, making them perfect for individual serving. (If you don’t grow these little guys yourself, local farmers markets may have farmers who grow them in the smaller sizes.)

When preparing the patty pan, the odd shape can confound cooks. You can avoid the whole idea of how to slice patty pan squash and cook them whole. Whole patty pans can be steamed over boiling water until tender, about 4-6 minutes, depending on size.

You can also roast patty pans, though they cook more evenly if you slice them in half first. Place the pieces on a baking sheet and roast on the top rack for about 10-15 minutes at 420°F, until tender. You can coat with olive oil or butter and season to taste before hand, if you so choose.

Patty pans also make great little edible serving bowls. Scoop out the centers, either before or after cooking, and fill with a stuffing of your choice.

If you want to be brave and slice your patty pans, feel free to slice them any way you like. You can slice through the diameter, dice them into chunks, or simply scoop out the cooked flesh. There is no right or wrong when it comes to chopping it.

In the event that the flying saucer shaped squash starts hovering over the counter, then something’s wrong.                                                                 

Thursday, August 23, 2012

Sweet Potato Blondies


Sneak peak:  Sweet potatoes will be in your share tomorrow.  
Below is a sweet way to use them.  If you've never had sweet potato blondies you're in for a treat - Enjoy!

Ingredients:  
  • 1 cup butter, softened 
  • 2 cups sugar 
  • 1 1/2 cups flour 
  • 1 teaspoon salt 
  • 4 eggs 
  • 2 teaspoon vanilla 
  • 2 cups grated raw sweet potatoes 
  • Glaze (recipe below) 
Preparation: 
  1. Preheat oven to 350. Cream butter and sugar. 
  2. Add remaining ingredients in order listed, stirring after each addition. 
  3. Spread in a greased 9x13 inch pan. 
  4. Bake for 45 minutes or until a toothpick comes out clean. 
  5. Spread glaze (recipe below) over blondies while still hot. 
  6. Cool completely before cutting. 
Glaze

Ingredients: 
  • 1 cup powdered sugar 
  • 2 tablespoons melted butter 
  • 2-3 tablespoons milk 
Preparation: 
  1. Mix powdered sugar, melted butter and enough milk together to make a thin glaze.  
  2. Spread over hot blondies. 

Monday, August 20, 2012

Sweet Pepper Upside Down Cake


Ingredients: 
  • 2 large red bell peppers
  • 1/2 teaspoon saffron
  • 1 tablespoon water
  • 4 tablespoons butter
  • 3/4 cup packed light brown sugar
  • 1 teaspoon cinnamon
  • 1 cup masa harina (traditional flour used to make tortillas, tamales, and other Mexican dishes; wheat flour can be in place of masa harina)
  • 1 tablespoon polenta
  • 1/4 teaspoon kosher salt
  • 1 teaspoon baking powder
  • 1 stick unsalted butter at room temperature
  • 1/2 cup light brown sugar
  • 1/4 cup sugar
  • 2 eggs room temp
  • 1 teaspoon vanilla
  • 1/4 cup milk.
Preparation: 

Chop the top and bottom off the bell peppers and quater the pepper lengthwise, trimming any seeds or white membrane from the inside. Lay the strips of bell pepper on a baking sheet skin side up. Move your oven rack to the top position and turn the broiler on high. Put the sheet of bell peppers directly under the heating element and broil until the skins are charred almost solid black. This gives the peppers a nice smokey flavour. Once charred, put them in a ziplock bag, and seal the top and allow to cool. The steam escaping from the hot pepper dislodges the charred skin so it is easy to peel.
Crumble the saffron into a bowl and cover with the water.
Peel the roasted peppers and cut them into thin triangular strips. Butter the bottom of a 9″ round cake pan and lay the strips down in a circular pattern. It’s okay if there are small gaps between the peppers. Make the caramel by adding the butter, sugar and cinnamon in a pot over medium high heat. Cook until the sugar is melted (there shouldn’t be any granules of sugar left), but be careful not to burn it. Pour the mixture over the prepared bell peppers. The hot mixture may spatter, so please be careful.
Whisk the masa harina, polenta salt and baking powder together in a bowl. Put the butter, light brown sugar and sugar to the bowl of an electric mixer and beat until smooth and creamy. Add the eggs one at a time and beat until incorporated. Add the vanilla, saffron and soaking water and continue beating then slowly add the milk until fully incorporated. Add the flour mixture in all at once, then beat until smooth.
Pour the batter in to the pan with the peppers and caramel and flatten off the top. Bake for 35-40 minutes or until a toothpick inserted into the center comes out clean. Remove the pan from the oven and let it cool enough to touch. Put a plate on top of the pan and flip it over to invert the cake onto the plate. If any of the peppers stay stuck to the pan, just remove them and put them back into place on the cake. Allow the cake to cool to room temperature then slice and serve.
Recipe courtesy of www.norecipes.com 

Monday, August 13, 2012

Freezing Tomatoes

The following tutorial on how to freeze tomatoes is courtesy of www.pickyourown.org

Freezing home grown or farm fresh tomatoes for use in winter cooking is very easy to do! The flavor of spaghetti sauce, lasagna, and salsas you make then will be superior to those made from canned tomatoes or store bought so called "fresh" tomatoes.

Here's how to do it, in easy steps and completely illustrated.   This method is so easy, ANYONE can do this!  It's a great thing to do with your kids! 

Ingredients and Equipment
  • Tomatoes - any quantity, ripe but not over ripe, still firm
  • Vacuum food sealer or plastic freezer bags
  • 1 large pot
  • Large slotted spoon 

Process - How to Make Spaghetti Sauce from Fresh Tomatoes

1.  Remove tomato skins. 

Here's a trick you may not know: put the tomatoes, a few at a time in a large pot of boiling water for no more than 1 minute (30 - 45 seconds is usually enough) then plunge them into a waiting bowl of ice water.  This makes the skins slide right off the tomatoes!  If you leave the skins in, they become tough and chewy in the sauce, not very pleasant. 


2. Removing the skins, bruises and tough parts

The skins should practically slide off the tomatoes.  then you can cut the tomatoes in quarters and remove the tough part around the stem and any bruised or soft parts. After you have peeled the skins off the tomatoes, cut the tomatoes in half.  Now we need to remove the seeds and excess water. 

Note: why remove the skins? They become tough and discolored in storage.  You wouldn't want to eat them!

3. Squeeze off the sides and water

Just like it sounds: wash your hands then squeeze each tomato and use your finger or a spoon to scoop and shake out most of the seeds.  You don't need to get fanatical about it; removing just most will do. Another way to do it is to cut each tomato in half, across it, instead of lengthwise. Then just shake the seeds and juice out. 

Here are before and after photos:


4. Drain the tomatoes
Toss the squeezed (Squozen? :) tomatoes into a colander or drainer, while you work on others. This helps more of the water to drain off.  You may want to save the liquid: if you then pass it through a sieve, screen or cheesecloth, you have fresh tomato juice; great to drink cold or use in cooking! By draining the water off now, you'll end up with a thicker spaghetti sauce in less cooking time! And that preserves vitamins (and your sanity).


5.  Fill the freezer bags

Don't overfill the bags, leave a little room for expansion. Do try to avoid leaving any air pockets!   A vacuum bag is shown at left, but you can use ziploc (or similar) bags, show below.  But be sure to squeeze out the extra air.


6. Vacuum seal the bags (if you have a vacuum sealer) 


Obviously if you haven't got a vacuum food sealer, just inspect the bags and you may need to open them and reseal them to eliminate any air pockets!

TIP:  If you don't own a vacuum food sealer to freeze foods, place food in a Ziploc bags, zip the top shut but leave enough space to insert the tip of a soda straw. When straw is in place, remove air by sucking the air out.  To remove straw, press straw closed where inserted and finish pressing the bag closed as you remove straw.


7.  Freeze the bags

Pop them into the freezer (on the quick freeze shelf, if you have one).  Now leave them for 2 or 3 hours till frozen.


Put in the back (coldest part) of your freezer.  And wait for a cold winter night when it is dark and dreary out, to remove it and defrost (microwave works well) and use in making so fresh tasting spaghetti sauce or other tomato cooking!

Sunday, August 12, 2012

Spaghetti Squash: A vegetable with a surprise inside


Welcome to the first of the season’s "winter" squash! So named because it stores well, winter squash, like everything else, is ready early this year, and the quick-cooking spaghetti squash serves up nicely for end-of-summer meals. Cut it open and you’ll see a whole dish of pasta! The moist flesh of spaghetti squash separates into strands that resemble pasta, which serve as a perfect substitute for your favorite brand of noodles in any past or lo mein dish.

Originally cultivated in Italy and Spain, the yellow, oblong squash also goes by the common names of vegetable spaghetti and gold string melon and is related to delicata, acorn squash, pumpkins and zucchini. This squash flies under the radar and there is little documented history. If not overcooked, the squash strands fluff with a fork and retain a bit of crunch. The flavor is slightly sweet, a little nutty and just a bit lemony, making it a refreshing accompaniment to grilled seafood, chicken and other hot-weather fare.

Spaghetti squash is available year-round at the grocery and available now from local sources. Look for squash that is heavy for its size and blemish free. The skin color should range from pale yellow to orange. Green skin indicates the squash isn't quite ripe yet. Store at room temperature for several weeks or cook, shred the flesh and freeze. The seeds will clean and roast up just like pumpkin seeds and are a perfect garnish or snack.

To cook, either pierce the skin and bake whole, or carefully slice in half lengthwise, scoop the seeds and bake, cut side down, until you can pierce the squash easily with a knife. Once cooked, the flesh removes easily with a fork. Set the kids to this task; they'll love it.

Source: The Commercial Appeal

Tuesday, August 7, 2012

Fine Food on the Go in Saint Louis City


Food Trucks are a trend that’s been lively on the coasts for a few years now, and while they entered the dining scene in St. Louis just a short time ago, there is no question that they are here to stay. Today, an ever-growing number of trucks and wagons take to the streets each day, tweeting out their locations so hungry diners can line up for a meal on the run. St. Louisans can now get just about anything they want from these mobile culinary mavens from pizza to tacos, cupcakes to crepes', sushi to sausages, at a price that's easy on the pocketbook. 

Sauce Magazine kicked off their first Food Truck Friday of the year on May 11, 2012, and this monthly tradition continues to thrive on the 2nd Friday of every month on the southwest side of Tower Grove Park from 5-8pm. 

The craze is catching on, so here are some of Sauce Magazine’s top tips for Food Truck Friday:
  1. Be early:  The early bird gets the cupcake. Don't be let down by showing up to late. 
  2. Bring seating:  chairs or blankets and mark your turf. 


  3. Divide and conquer:  Hit up a few different trucks with friends, then share the goodies. 


  4. Find a volunteer:  Volunteers will be able to answer questions and direct you to your favorite trucks.
  5. Park far from the trucks:  longer trek but faster getaway. 


For more tips and information about Food Truck Fridays in St. Louis, check out Sauce Magazine’s website at  http://www.saucemagazine.com/foodtruckfriday.php 


Source: Sauce Magazine